

|
Last week we completed the inlet tube and we start this week with the drain and then finish up the tank. The drain is made up of a 1" PVC female adapter, 1" male adapter, 1" PVC ball valve, 1" PVC pipe to threaded garden hose fitting and a 1/4" piece of wood for filler since the two adapters will not tighten down together. Drill a through hole near the bottom of the tank. Drill the same size hole in the 1/4" piece of wood. Glue the garden hose fitting into the valve. Cut a 2" long piece of 1" PVC to connect the valve to the male adapter. Glue the male adapter and the valve together with the 2" piece. Using silicone sealer around the hole, install the drain valve through the wood, tank and into the female adapter. Tighten them up and let the silicone set up.  For the outlet we used 2" PVC since we want to make sure that the tank doesn't get backed up. If we made the inlet and outlet the same size there could be some potential for it backing up. We used the same arrangement of fittings as we used on the inlet pipe and drain to get through the tank. You will need a 2" female adapter, 2" male adapter, 2" PVC pipe, about 3" long, 2" 90 degree elbow and a 1/4" piece of wood for filler. Drill a through hole in the tank so the bottom of the hole is right at the top of the top grid. This will be below the inlet pipe. Drill the same size hole in the 1/4" piece of wood. Cut a small piece of 2" PVC pipe approximately 3" to splice the outside adapter to the 90-degree elbow. Glue the elbow and adapter together. Put the 1/4" piece of wood on the outside of the tank and insert the adapter through the wood and hole in the tank. Put a bead of silicone sealer around the fitting before you tighten it down. Be sure the 90-degree elbow is pointed in the direction you need. Ours is pointed straight down. Next cut up the washable furnace filter mats into 8" x 8" squares. Marilyn would highly suggest wearing long pants and gloves while doing this. She didn't and was itching for a couple of days after. Now it's time to put the whole thing together. Put the bottom support in place. Put the lower grid in with the hole aligned for the inlet pipe. Next comes the top support. Place it so that its legs sit on top of the bottom supports legs. Now start filling the middle section with the filter pieces. Temporarily put the inlet pipe in place to help with alignment later. Just place the filter pieces randomly and again wear gloves. Fill up the entire middle section.  Pull the inlet pipe out and put on the top grid again aligning the hole for the inlet pipe. Put the inlet pipe back into the tank and attach it to the side of the tank. Do not glue it or use silicone sealer. You will need to take this off for cleaning from time to time. 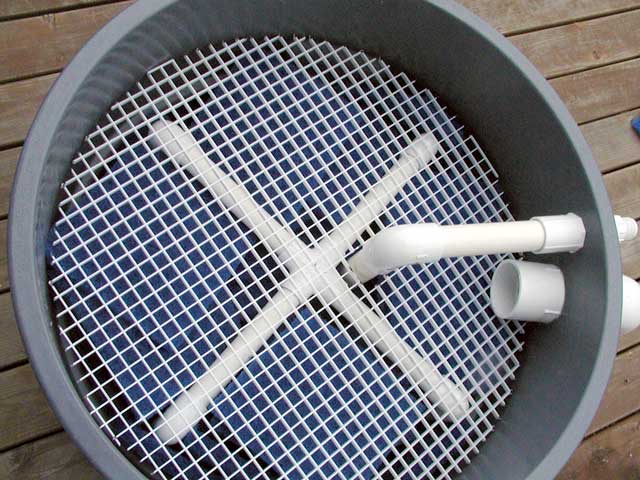 Once you get your tank in place you can put a layer of small rocks on top of the grid to help hold it in place. This may not be necessary but it makes it look neat.  Next week we will build the Jenny box for the pump and finish our pond bio filter project.
|
|
The AllAmerican RunnerDuck Review Visit our Blog, www.runnerduckreview.wordpress.com, and sign up to receive notifications when it is updated. Our newsletter is a monthly blog with woodworking projects, crafts, recipes, and more. When you get to our blog just enter your email address and click "Sign Me Up". This is what it looks like:

|