|
|
|
|
|
| Welcome Back |
| Wow
what a month we had. Weather wise it was pretty typical March weather
here in Western Washington. Sunshine, rain, partly cloudy, hail,
wind, sunshine, snow, you get the idea. Hopefully we are all done
with any freezing weather and we can start seeing our garden grow.
The
big news is a visitor that came to see us this month. We're sure
you've heard us talk about her many times in our "Site of the
Month" section of this newsletter. Roz Savage, the first woman to
row the Atlantic Ocean SOLO and who is currently attempting to be the
first woman to row the Pacific Ocean SOLO shared our campfire.
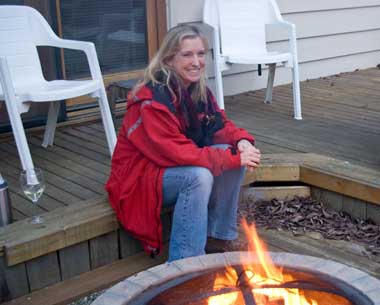 What
an honor that she would come to our little home and spend some time
with us. So far she has rowed across the Atlantic Ocean and from Los Angles, California to Hawaii
and from Hawaii to Tarawa.
She had many stories to tell about her adventures and we shared lots
of philosophy on saving the planet.
Her
mission at the moment is "Rowing towards a greener future" and to
"Save the planet one stroke at a time". She is bringing awareness
of the poor condition of our earth's oceans to the masses and
showing how together, making small changes in our lives, we can have
a profound effect on the earth.
While
she would like to have a massive influence on "climate change"
she realizes that it is really too big and controversial to get much
traction. This is not saying that she's going to quit trying to
raise awareness but... A more immediate impact is; "through the
reduction of plastic in our daily lives the oceans will be much
healthier". Plastic water bottles and plastic shopping bags that
end up in the oceans or land fills do not biodegrade but instead slowly disintegrate
into smaller and smaller pieces of plastic that all the species in
the ocean can ingest. Ultimately we get it back in the form of the fish
we eat.
After
we talked the bottom line is that if everyone does a little something
each day to green up the world the world will become a better place.
Are you an "ECO Hero"? Check out Roz's latest blog and see how
you and your family can become ECO Heroes!
The ECO-Heroes web site is not fully up and running yet but you can
still register at 
We
have definitely made a new friend and will be pulling for her in the
third and final leg of the Pacific row which will begin on April
17th,
if all goes well.
Roz lives out of a suitcase when she's not on her
boat. Her only income is from speaking engagements, book sales and
donations. We encourage all of you to visit Roz's web site where you can follow her adventure and while you're there please make a donation
or buy her book, "Rowing The Atlantic, Lessons Learned On The Open
Ocean". To help her out go to, www.rozsavage.com.
We thank you and we know Roz will thank you.
Ken and Marilyn
|
 |
Wood'n Wares Hand Made Wooden Utensils
|
We've been getting lots of compliments on how well our Spoon Oil works on many different wood projects. If you've tried our Spoon Oil we'd love to hear your story on how you used it and how it worked for you.
If you're not familiar with Spoon Oil this non-toxic tasteless finish is perfect and makes your projects look great. I like to rub a couple of coats into the wood and then buff it with a buffing wheel. It's a great safe finish for all sorts of wood. I used it on some wooden knife handles I made and it worked great. You can get Wood'n Wares Spoon Oil just by clicking on the link below.
While you're there check out their wonderful, Wood'n Ware hand crafted, hard maple kitchen tools. They feel great in your hands and work exceptionally well. Not only do they look and work nice but they last a lifetime when treated with our special Spoon Oil. Check out the large selection by clicking on the display below. www.runnerduck.com/woodnwares.htm.
 | |
 |
| Wood Plans |
 |
| Woodworking Tools |
Rockler Specials
Rockler always has great specials, here's the latest!
 | |
|
| What's New? |
Coupeville
has a newly rebuilt and expanded library. The good people of
Coupeville and other people from Island County and Snohomish County
voted for a $1.5 million dollar expansion that was just completed this
month. It's really much larger, lighter and more conducive to
reading and relaxing than before. It also houses a new meeting area
for gatherings of all kinds. It's really nice to have something
that grand in our little seaside village.
One nice feature of the new library is a web cam that they have mounted on top of the building. It points north towards town and the wharf. Check it out to see what things look like in Coupeville, http://www.sno-isle.org/?id=4269
Ken
has joined the "Island Life Fitness Center" to get some needed
cardio exercise and some range of motion and strengthening in his bad
shoulder. Another incentive is that his brother Ron,
www.walkingfortbragg.com
and sister Diane, www.ilregalo.us
are having a "weight wace". So far Ron is winning but he is also
swimming a mile a day and walking three to six miles a day. Diane and
Ken are still working so it's a little tougher for them. The good
news is; win or loose in the weight department we're all winning in
the health race.
One of the things that even small towns can't
avoid is crime. Here in Coupeville crime is rampant as noted in this past
months Crime Watch. Here are some of the more interesting calls our local
police have received:
Monday, March 22
11:15 p.m. Caller says "they" - the
family, including his mother - were visiting and were forced into the hospital,
and the hospital won't release them.
Tuesday, March 23
3:56 p.m. Caller from W. Welcher and
Wandering Lane reports a blue four-door car occupied by two males who were
going through people's mailboxes.
Wednesday, March 24
2:36 p.m. Caller reports two high school
students on S. Main skateboarding on the road and obstructing traffic.
1:28 p.m. Caller reports her bike was taken
from inside her car while parked at S. Quail Trail. She says she now saw her
bike on an Island Transit bus headed toward Oak Harbor.
Like I said, we're out of control ;-)
|
|
Marilyn's Corner |
|
|
 Mason
bee homes are often called "trap nests" but I prefer "bee
house". Mason bees are great pollinators which is always a good
thing in the spring when the fruit trees are blooming. They like a
home that has 1/4" to 3/8" diameter holes that are 3" to 6"
deep. You can make these by drilling holes in pieces of wood but I
think this house is pretty cool.
The
female starts filling the hole in layers, first with nectar and
pollen, then an egg, more nectar and pollen then another egg. This
continues until the hole is filled. She'll cap the end of each hole with mud so it's a good idea to have these houses close to a mud source. These eggs will not hatch until
the following spring and lie dormant over winter as long as they
remain cold.
This
Mason bee house is made from a plastic container (great way to
recycle) with straight walls and has a snap on lid. It just happens
to be an empty frosting container.
Attach
the container to a small piece of wood using a couple of screws so that it can be mounted to a
wall. You'll want to remove the nest from the wall for winter
storage.
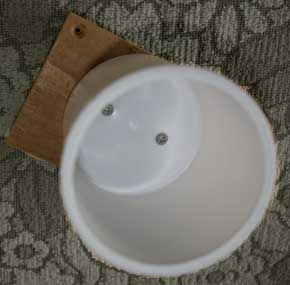 Cut
straws to fit flush to the top of the container and fill it full, they should be packed really tight.
After
the Mason bees have filled the tubes and they have sealed over the ends of
each one with mud it's time to cool them down. Once all this activity is complete just pop the
lid on the container and place it in your freezer until next spring.
March
is a good time to bring it out and place it on an easterly facing
wall and wait for nature to take its course.
These
are very gentle bees and you can never have too many. They'll only
sting if provoked by rough handling.
Be
sure to get the kids involved in making these Mason bee homes, it's
a great lesson of nature.
If you have a craft project that you'd like to share with our readers just send it to marilyn@runnerduck.com. |
| The Tempos Big Swing Band |
If you have an event planned in the Seattle area and are in need of a great band, The Tempos are ready to perform for you. Just drop a line to kennyb@runnerduck.com
The Tempos
The Tempos CD, "Big Swing", features fourteen great swing songs from the 40's and 50's. If you love the old big band swing music we think you'll enjoy this CD. It's the kind of music that makes you just want to get up and dance, you do remember how to swing don't you?
The only place you can get this CD is from our web site. Go to www.thetempos.com and click on the "Click Here" at the top of the web page or click the album cover.

CLICK HERE.
If you'd like to get a taste of this CD just go to The Tempos web site. When you are at the Tempos web site click on the horn valve button that says "Hear our CD". Then click on the song titles to hear a little bit of each song.
The Tempos big swing band is available for hire. If you have a special event that could use the wonderful music of a classic sixteen piece big band be sure to contact kennyb@runnerduck.com. We perform all over the Seattle area for all sorts of events. |
| Joke of the Month |
This weeks joke comes from sister Michelle C, very cute :-)
After getting all of Pope Benedict's luggage loaded into the limo
(and he doesn't travel light), the driver notices the Pope is still standing on
the curb.
"Excuse me, Your Holiness", says the driver, "Would you please take your seat
so we can leave?"
"Well, to tell you the truth", says the Pope, "they never let me
drive at the Vatican
when I was a cardinal, and I'd really like to drive today."
"I'm sorry, Your Holiness, but I cannot let you do that. I'd lose my job! What
if something should happen?" protests the driver wishing he'd never gone to
work that morning.
"Who's going to tell?" says the Pope with a smile.
Reluctantly, the driver gets in the back as the Pope climbs in behind the
wheel. The driver quickly regrets his decision when, after exiting the airport,
the Pontiff floors it, accelerating the limo to 125 MPH.
"Please slow down, Your Holiness!" pleads the worried driver, but the Pope
keeps the pedal to the metal until they hear sirens.
"Oh, dear God, I'm going to lose my license -- and my job!" moans the driver.
The Pope pulls over and rolls down the window as the cop approaches, but the
cop takes one look at him, goes back to his motorcycle, and gets on the radio.
"I need to talk to the Chief", he says to the dispatcher.
The Chief gets on the radio and the cop tells him that he's stopped a limo
going 125 MPH.
"So bust him", says the Chief.
"I don't think we want to do that, he's really important", said the cop.
The Chief exclaimed, "All the more reason!"
"No, I mean really important", said the cop with a bit of persistence.
The Chief then asked, "Who do you have there, the mayor?"
Cop: "Bigger."
Chief: "A senator?"
Cop: "Bigger."
Chief: "The President?"
Cop: "Bigger."
"Well", said the Chief, "who is it?"
Cop: "I think it's God!"
The Chief is even more puzzled and curious, "What makes you think it's God?"
Cop: "His chauffeur is the Pope!"
Give me a sense of humor, Lord,
Give me the grace to see a joke,
To get some humor out of life,
And pass it on to other folk.
|
| This Month's Free Recipe |
 Eggs Ala Goldenrod Eggs Ala Goldenrod
We roll this recipe out every couple of years because it is such a special treat at Easter time. After you are done with your
Easter Egg Hunt make this delicious breakfast. This recipe uses one dozen hard
boiled (decorated) eggs.
Peel the hard boiled eggs. (so much for the decoration)
Divide the Egg
Whites into one bowl and the Yolks into another.
In the Yolk bowl add Salt
and Pepper to taste and fluff with a fork. This is the Goldenrod!
In the Egg
Whites bowl cut up the Egg Whites into bite size pieces.
In a saucepan make a medium white sauce as follows.
- 4 Cups Milk
- 8 Tablespoons Butter
- 8 Tablespoons Flour
- 1 teaspoon Salt
- 1/2 teaspoon Black Pepper
Melt the Butter in a pan, add Flour, Milk,
Salt and Pepper.
Bring to a low boil to thicken, reduce heat and add Egg
Whites. You may have to thin with a little Milk.
Pour the Cream Sauce over
toast or biscuits and top with a sprinkling of the Egg Yolks.
Tasty additions
include Bacon or Ham on the side or on the toast or cheddar cheese.
If you have any leftovers, (I can't imagine), add Peas, cooked Potatoes,
Pearl Onions and the Yolks to the cream sauce. Serve it with your Holiday Ham.
This is a very old recipe that has been in Marilyn's family for generations.
We hope you enjoy it for your Easter.
If you have a recipe you'd like to share with our readers please send it to marilyn@runnerduck.com. We'd love to share it with everyone. |
| Woodworking Project |
WOOD PROJECT PLANSDOWNLOADABLE & MAIL-DIRECT
WOODWORKING PLANSDownload WOOD Store® woodworking plans directly to your computer and start building in just minutes! OR, we'll mail them to you, your choice!

CLICK!
This Months Woodworking Project
Woodshop Tips
I'm
sorry but I did not get my glider chairs completed in time for this
month's newsletter. I had great intentions but as they say, "best
laid plans". Maybe by next month I'll have them completed and
documented for you.
In
the mean time I've got some tips for you that I used while making
my glider chairs. They can be used on a lot of different woodworking
projects but definitely will help with the gliders.
1.
Drawing a large radius or circle.
Starting
out really simple I like to make large radii or circles with round
objects like paint cans. 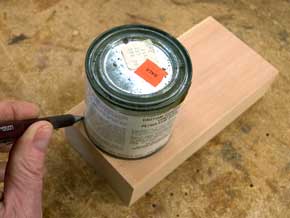 Of course you can break out the compass,
measure in and equal distance from the corner in both directions,
find the center and draw your arc or plop down a paint can
approximately the right size and draw a line. Unless I'm doing
something critical this is how I do it.
2.
Drawing Curved lines.
My
favorite tool for drawing curved lines is a French curve.

3 Piece French Curve Set
I
have a number of them and they come in quite handy. I figure out
where I want my line to come from and where I want it to go or merge
with another line. I align the French curve with these points and
draw a line. The problem comes when you want to make that same curved
line to match at the other end of the piece you are working on or
another piece. 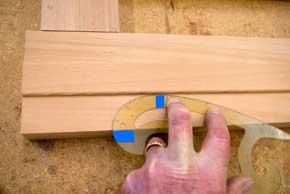 I
use a piece of masking tape to mark the starting point of my curve
and where it merges with another line or point. Since the French
curves are clear I just flip it over and match the tape up to my
other points, draw a line and I have an exact match.
3.
Sanding inside curves smooth.
There
are many ways to sand the inside of curves all the way from hand
sanding to oscillating sanders. My choice is my trusty old bench top
belt sander.  It doesn't work in all cases due to the size of the
rollers but for larger radii it works great. I hold the piece I'm
sanding flat on the belt and then run it into the radius of the
roller where it curves while lifting up the other end. You do have to
be careful and have a light touch so you don't sand grooves into
your piece but it does work good for me especially on the base of my
glider chairs.
4.
Plugging screw holes.
My
glider chairs are going to use a large number of screws that will
reside in plugged holes. For all of the seat and back pieces I needed
to drill screw holes the same distance in from each end. I set up my
drill fence with a stop. I set the back of the fence so that the hole
will be centered on each piece.  First I drill 3/8" counterbore
holes about 3/8" deep using a Forstner bit on each end.

22-Piece Forstner Bit Set
Set
the drill depth stop so that the 3/8" depth is achieved. The
Forstner bit leaves a nice little point in the bottom of the hole so
I no longer need the fence and stop to drill the countersink hole for
the screw.
After
I've drilled all my counterbore holes I set the depth for the
countersink so that the screw head will be flush with the bottom of
the counterbore.
 
Rockler/Insty-Drive Tapered Drill Bits and Countersinks
Once
the gliders are assembled I cut plugs from the same wood that I'm
using, cedar in this case. I use a tapered plug cutting tool and
drill about 1/2" to 3/4" into the wood.

Hex Shank Tapered Plug Cutters
After
I've drilled a bunch of plugs I take it to the band saw and cut all
the plugs out from their holes.
 I
carefully apply glue to the hole making sure I don't get any glue
around the outside of the hole. I carefully tap the plug into the
hole taking it easy so I don't split the wood.
After
the glue has dried I use a flush trim saw to remove the part of the
plug that extends above my pieces, then sand.

Dozuki Dovetail/Flush-Cut Saw
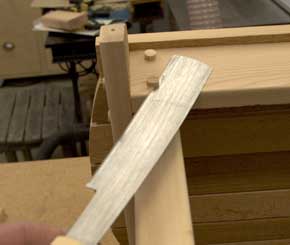 I
hope these ideas help you with some of your wood projects, I know
they will if you decide to build my gliders.
We hope you liked this project. If you build it and your friends ask where you got such a clever idea, please tell them that you got it at RunnerDuck.com.
|
|
If any of you have wood projects to share I would be happy to put it into a format for our newsletter. Just send me an email at kennyb@runnerduck.com and lets see what we can come up with. Thank you! |
| Free Rockler Catalog |
|
Get a Free Rockler Woodworking Catalog by clicking on the link below

| |
|
If you want to talk about something just drop us a line to kennyb@runnerduck.com any time, we like to talk about most anything. We are always looking for content for our newsletter so if you have something to add we'd love to publish it, assuming it meets our strict family oriented requirements!
All rights reserved, RunnerDuck Productions,
2000, 2001, 2002, 2003, 2004, 2005, 2006, 2007,2008, 2009, 2010
RunnerDuck and its logos are property of
RunnerDuck Productions.
All other logos are property of the individual companies.
We can be contacted at kennyb@runnerduck.com.
Past RunnerDuck Review Newsletters
|
|
|
|
|
| | |
|