

|
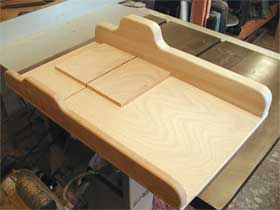 Table Saw Sleds are great for making accurate cuts. They are also really good for making set ups for repeatable cuts. We think you'll find this an easy yet great addition to your woodshop tools. Here's what you'll need:
1/2" A1 plywood
Cut two 16" rails from strips of maple to fit the tracks in your table saw. They will most likely be 3/4" wide and 3/8" thick.  Cut a 1/2" thick piece of plywood 16" X 26". Set your table saw fence 2" from the edge of the right groove. Put each rail in the grooves of your table saw with the countersinks facing down. Extend each rail off the back of your table so that the first countersink holes show. Put the sled on top up against the fence. Align the rails with the edge of the sled and put a screw in each. Run the rails and sled to the front of the table saw and repeat the process. Remove the sled and install the rest of the screws.  Cut two 3/4" thick pieces of alder 26" long. Glue and clamp the two pieces together being very careful to align the bottom.  Layout the cut lines for the Back Fence. Draw a line 3" up from the bottom. Measure 5" in from one end and draw a line. Draw another line at 11". Use a small can or round item to draw curves between the 3" line and the top of the fence.  Cut the back fence along the lines. I found it easier to use my table saw to cut the straight lines and finish the radius lines with the band saw.  Route the top edges with a round over bit.  Repeat this step on the 1" piece for the front. It should be 2" high and 3" at the high point. Route a small stepped groove about 1" long and 1" in from the left end on the back of the sled. Route a 3/32" slot through the sled. Route a 1/2" wide second groove about 1/8" into the sled. This is to allow space for a pan head screw. You will use this slot to help square up the back fence.  Drill counter sink holes for the screws that will hold the fences on. Make them 1/2" in from the edge. Starting 1" from the right end make a hole every six inches. Align the back fence to the edge of the sled and clamp it in place. Put in one screw on the right end (1" in). At the other end put a pan head screw into the slot. Tighten it enough so that it holds the fence from turning but you can move it by tapping on it. Turn your tables saw blade all the way down. Mount the sled centered over the blade. Start the saw and slowly crank up the blade while holding down the sled. Raise the blade to its full height. It's best to use a fine planer blade because they are flatter. Turn the saw OFF! Using a large square, square up the back fence to the saw blade. Once you have it perfectly aligned carefully remove the sled and tighten the pan head screw.  Align and mount the front fence using flat head screws. The alignment is not as important for the front since it will not be used for holding wood. Radius the corners to match the radius of the front and back fences and you should be good to go. You can check your alignment by cutting a piece of wood and flipping half of it over. Align the cuts and verify that there is no space between them. That's it. Now get out there and make some sawdust! We hope you've enjoyed this project and have good success with it. Remember, if you ever have any problems with our projects just drop us a line and we'll try to help. Since we build every one of these projects we have a pretty good idea of how to get through them. We also make lots of mistakes so we can help you avoid them. For a great selection of woodworking supplies and tools check out Rockler, Great Prices/Great Selection! |
|
The AllAmerican RunnerDuck Review Visit our Blog, www.runnerduckreview.wordpress.com, and sign up to receive notifications when it is updated. Our newsletter is a monthly blog with woodworking projects, crafts, recipes, and more. When you get to our blog just enter your email address and click "Sign Me Up". This is what it looks like:

|