

For more great plans click on the banner below.
|
|
Recovery From A Design Change
Have you ever had a project that changed direction once you got started on it? This is a story about one of those projects.
I designed and started building a new stand and cabinet for over the toilet. It will be featured in an future newsletter. After numerous changes to the design it was finally time to cut wood. I started with the legs, cut them to length, cut in the mortises and had put tenon's on the cross pieces. That's about the time Marilyn saw her sisters new toilet that was higher than a standard toilet. She thought it was great and asked if it would work with the new cabinet I was making. Of course it will work if I add 3 1/2" to the legs!
Since I had already spent a fair amount of time getting the legs to this point I really didn't want to start over so I added extensions to the legs. That is what this months project is all about, recovery!
The first thing I did was glue up some new wood for the extensions. The legs are 2" X 2" so I used 5/4 fir and glued them together.
 Next I marked the center of each piece using my handy dandy Steel Center that Marilyn got me for Christmas.

 I set up my drill table to drill 3/4" holes 3/4" deep in the end of each leg extension. 

Next I turned my attention to the tenon's. I needed to cut a 3/4" long tenon with a 3/4" center in the middle of each leg. Since the extensions were not exactly the same size as the legs this became a challenge. Also my drill centering was a tiny bit off from piece to piece so I needed to make each tenon a little different. I'll try to explain how I recovered below.
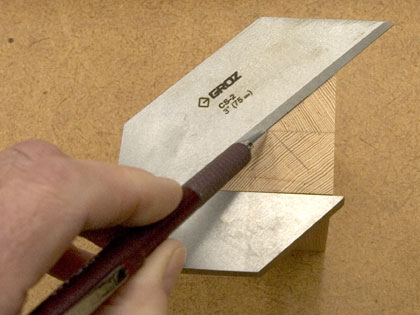
 Since there was a tiny bit of difference for each leg extension I marked each matching leg and extension with chalk. I then set my blade height for each side to match the mortise of the extension by lining it up with the bottom of the mortise.
 Next I needed to cut the cheeks for each side of the legs to match the mortise of each extension. I used calipers to measure each side.
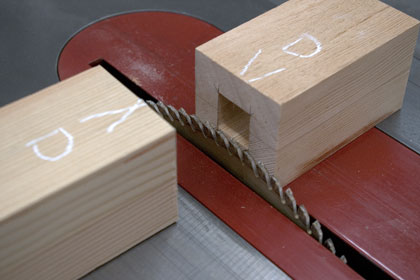
 I transferred that measurement to my tenoning jig, set the blade to 3/4" and cut the cheeks.

I performed a fit check lining up the marks I'm made on each piece and they fit perfectly!
 I decided to glue up all four legs at once since I don't have a whole lot of long clamps.
 I dry-fit everything and had everything ready to go before I applied the glue. I quickly put the glue on each mortise and tenon and clamped it tight.

I put a piece of scrap wood between each leg so if there was any squeeze out of the glue they would not bond together. I also used scrap wood on each end and clamped it down with pipe clamps.
These clamps were on sale as of last Thursday. You might check them out and see if they are still on sale, great price! That's about it. We hope you liked this project. If you build it and your friends ask where you got such a clever idea, please tell them that you got it at RunnerDuck.com. |


|
The AllAmerican RunnerDuck Review Visit our Blog, www.runnerduckreview.wordpress.com, and sign up to receive notifications when it is updated. Our newsletter is a monthly blog with woodworking projects, crafts, recipes, and more. When you get to our blog just enter your email address and click "Sign Me Up". This is what it looks like:

|