
|
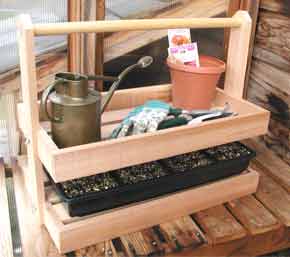
 We weren't sure what to call this project because it can be use for any number of things in the garden. Since we designed it around the plastic potting trays and it can be set up to carry tools in the tray we thought potting tray was appropriate. Because you can flip both the top and the bottom over we figured it was universal hence, "Universal Potting Tray".
No matter what you call it we think you will find this useful when you are moving your seedlings from the greenhouse to the garden.
Here's what you'll need:
 You can click on the picture for a bigger view.
Everything except the handle is cut from 1" X 3" stock.  Drill a 3/8" hole the rest of the way through. Glue and nail the ends and sides together forming two square frames. Butt join the ends to the inside of the sides. Measure and cut three shelves to fit between the ends of each frame. This measurement will be about 21" but may vary due to the thickness of your wood. Glue and nail the shelf pieces into the frames. Space them evenly across the width of the frame. Cut two supports 18" long. Cut two 3/4" X 3/4" X 45 degree chamfers at the top of each support. Stack the two pieces together and drill a 1" hole 1 1/2" down from the top. Set up your dado blade on your table saw 1/4" deep. Put the support against the end of the tray and mark the top of tray on the support. Measure up 8 1/2" and draw a line. Go up the height of the tray and draw another mark. You will dado in between these marks. Drill a 1/4" hole exactly in the center of each dadoed area. Attach the supports to the trays with the wing screws. Cut the 1" dowel to fit exactly from outside to outside of the supports. Glue and nail the dowel into the holes. That's it! You can use them as trays for holding tools or turn them over for holding plastic seedling trays. It makes them really easy to get on and off from the greenhouse to the garden. Everyone will wonder where you got such a cleaver idea. Be sure and tell them that it came from RunnerDuck :-) We hope you've enjoyed this project and have good success with it. Remember, if you ever have any problems with our projects just drop us a line and we'll try to help. Since we build every one of these projects we have a pretty good idea of how to get through them. We also make lots of mistakes so we can help you avoid them. For a great selection of woodworking supplies and tools check out Rockler, Great Prices/Great Selection! |
|
The AllAmerican RunnerDuck Review Visit our Blog, www.runnerduckreview.wordpress.com, and sign up to receive notifications when it is updated. Our newsletter is a monthly blog with woodworking projects, crafts, recipes, and more. When you get to our blog just enter your email address and click "Sign Me Up". This is what it looks like:

|