|
This project appeared in our January 1st, 2005 Newsletter.
Both Marilyn and myself got to play with pinball games similar to this one. We combined what we both remembered about them and came up with this one. We made it for our grandson Camden for Christmas and he was thrilled. There are some challenges to making this toy and it requires a little creativity on your part.

Here's a list of materials you'll need to buy.
1" X 6" X 3' Maple (full 1" stock)
1/2" X 12" X 4 1/2" Maple
14" X 22" X 1/2" Birch Plywood
1" X 1/2" X 14" Walnut
1/2" X 6" dowel
4" X 1/2" ID compression spring
A wooden knob that will fit on the dowel
(26) 1" #6 Zinc plated screws
Glue
1 1/4" finish nails
Marbles
14" X 9" X 3/4" MDF for template
If you don't have a planer I suggest using a Glue Line Rip Blade for the following cuts. If you use this blade only for ripping it will last a long time without needing reshaprening.
Cut two pieces of 1" maple 1/2" wide and 21" long.
Cut one piece of 1" maple 14" long.
Cut three pieces of 1" maple 7" long.
Glue the three pieces together so you have a piece 16 1/2" X 7".
Scrape the joints with a scraper to remove any glue and even them out. Here's a good scraper as part of a complete set.
Make a template for the top curve of the pinball using 14" X 9" X 3/4" MDF. Make a 6 1/2" radius arc centered left to right and 1/2" down from the top. I used a piece of scrap wood to make my arc. If I had received my Christmas present before this I would have used my Beam Compass. A very cool tool that I now use a lot!

Cut the arc on a band saw just slightly inside the line. Sand the arc smooth to the line.
Trace the arc onto your glued up 1" piece of maple.
Cut just inside the arc on your band saw.

Using double back tape attach the MDF template to the 1" maple.
Using a router with a pattern flush trim router bit.
I followed the template to make a nice smooth arc.

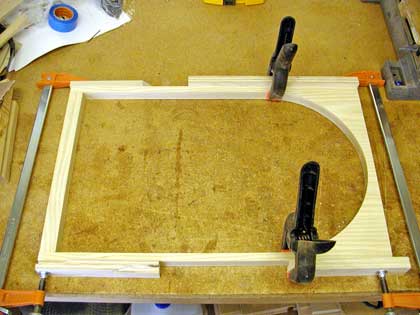
Next you want to glue and clamp the sides onto the arc.
Drill a 1/2" diameter hole in the bottom end piece centered 7/8" from the edge.
Glue and clamp the bottom end piece to the two sides.
Cut a piece of 1/2" birch plywood 14" X 22".
In order to get the cups and pins where we wanted them we attached a scrap piece of plywood to the frame with four screws.
Make a drill template to accurately place the cup holes. I made the top cup a 1 1/4" half circle and the others 1 1/2". Drill the hole pattern into a 3/4" piece of scrap using a 1/16" bit. Using the hole guide drill holes approximately 1/32" deep into the plywood.

To insure you drive the nails straight use a guide block made from 1" maple. Drill a 1/16" hole near one corner. Using your band saw cut out two sides to the hole. Just enough so it will still hold the nail but wide enough so you can pull the tool off after you've driven the nail.

Place the nails approximately as shown in the photo below. After you've put in the nails give it a try and see how it plays. Add nails as you see fit to make it more or less challenging.

Once you feel good about the nail placement, pull all the nails out and use that scrap piece of plywood for your template.
Tape 1/2" around the finish side of the birch plywood and add your stain.
After the stain dries add a coat of polyurethane.
Lightly transfer your nail pattern to the varnished board.
Using acrylic paint, apply your artistic touch. We used press on letters for the numbers.
Once the paint is dried spray paint it with a coat of clear polyurethane.
Remove the tape.
Pound in all the nails per your pattern.
Cut the front leg from 1/2" maple, 12" X 4 1/2". Cut the top edge at an angle so that the leg will be 90 degrees to the table when the game is set down. To get this angle place a 1" piece of wood under the front edge. With the front leg 90 degrees to the bottom of the game, mark a line parallel to the bench.
Use this same angle to cut the back leg. The back leg will be 12" X 1" X 1" with one edge cut at the above angle.
Drill a 3/4" hole in the middle of end of the back leg 6" deep. This will be where you keep the marbles for the game. I found the best thing to do this, after screwing up two perfectly good pieces of maple, was drill a small 1/8" pilot hole dead center in the end of the piece as making it as straight as you can. Then I drilled the 3/4" hole using a 3/4" paddle bit.
Drill countersunk holes along the front of the game to mount the front leg and holes along the back edge to mount the back leg. Be careful not to put screws where you just put the long 3/4" hole above. I used a 3/4" screw toward the drilled end and made it off center.
Screw and glue the legs to the base.
Drill countersunk holes all around the bottom spaced about 4" apart.
Glue and screw the bottom onto the frame.
Cut a piece of 1" X 1/2" X 14" maple.
Cut a curved radius on one end starting at the inside and going down to the outside, see the picture above.
Drill countersunk holes to hold the maple piece in place. It should be spaced far enough from the side to allow the plunger and spring to travel freely, approximately 1/8" clearance.

Cut a small 3/4" circle of 1/4" wood for the spring retaining end of the plunger. Drill a countersunk center hole, glue and screw it to the end of the plunger dowel.
Drill a 1/2" hole into the plunger to attach it to the dowel. I added a screw to give it added strength.
Spray paint several coats of clear polyurethane over the whole top and sides of the game.
Make sure the plunger slides easily in the plunger hole. You may have to sand it a little larger to make sure it slides without binding.
Put the spring on the plunger, put the plunger into the hole from inside the game and attach the knob.
We thought that the plunger made a little too much noise so we put a small piece of felt around the base of it.
Put the marbles in the back leg and plug the hole with a cork.
That pretty much finished your pinball game. This makes a great gift or just a lot of fun for the grand kids when they come to visit.
|


