

|
Oh boy a new project! We got a weather vane for Christmas and have been trying to figure out where and how to mount it. We finally decided to mount it on our "wheelhouse" on top of a cupola. Of course the first thing we need to do is design and build a cupola. After researching many sites on the web we did not find any free plans for one so we had to make our own. We hope you enjoy this project and the free plans that come with it.
 This project is a little challenging so we'll break it into three steps. This week we'll build the vents. Here's a list of what you'll need;
We used Cedar for everything but the plywood but you may want to choose other wood. We felt like Cedar would look the best and last the longest.
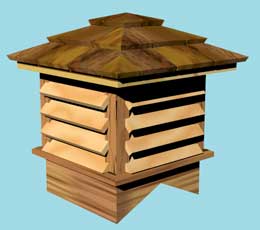
Cut some scrap pieces of wood 2", 4" and 6" long. Set the miter up on your table saw at a 45 degree angle. Cut four 1/2" dados on two sides of each piece. NOTE: If your stock for the vents is something other 1/2" then set the dado that width. Do this by setting up a stop on your miter for the first cut which should come out exactly to the corner of the 2" X 2".  After making your first pass put in the 2" spacer and make the second pass. Repeat this with the other two spacers. Cut all four posts and then set up your table saw for the opposite 45. Do the same thing again for all four posts.  Now cut the vents from the 3/4" X 4" Cedar. Cut the vents 2 7/8" wide using a 45 degree tilt to your table saw blade. Cut (16) pieces 9 1/2" long. Cut four of the pieces 2 3/16" wide with an opposite 45 degree angle.  Now all that's left is to assemble the vents to the posts. This is a little tricky but actually went better than I had imagined. Start by gluing one side of one post where the vents will go. Install the vents with the 45 degree angle approximately in the center of the post where the two opposing vents will meet.  Nail each vent into place. Put a post on the opposite end of the vents and repeat the process. Continue around the until all four posts are glued and nailed to the vents.  You should now have something that looks like this picture. Fit some screen around the inside of the vents to keep the birds and bees out.
The top of the base is made from four pieces 13" X 2 1/2" X 1" (3/4" finished thickness). Miter each corner 45 degrees, like a picture frame.  Assemble the frame using glue and nails. Toenail the corners together. Clamp it if you can for more support while drying.  Next cut four pieces 11" X 4" X 1" (3/4" finished thickness). Cut the corners at 45 degrees to make a box. NOTE: Depending on the pitch of your roof you may need to make the box deeper than 4". Measure the pitch of your roof using a couple of pieces of scrap wood and a screw or bolt.  Transfer the angle onto a base piece. Put two pieces together, back to back, with double back tape. This will hold them while you cut both pieces. Using your band saw or hand saw, cut out the angle.  Glue and nail the box together. Clamp it like the frame above until dry. Cut four pieces 1" X 6" X 3/4" for mounting blocks. Glue and screw these to the frame. Use the box to center them. These will be used to attach the cupola to the base when we install it on the roof.  The roof turned out to be the toughest part of the project so far. There was an awful lot of fiddling around with the different angles and shingles.
The base for the roof is 15" X 15" using 1/2" plywood. I'd suggest marine grade plywood if you don't paint your cupola.  Cut a notch in the top of one rafter and the bottom of the other so they will nest with one another. Glue and attach the rafters to the base by nailing from the back side. Center the base on the vent section we built last week and screw it down. Now cut the four pieces of sheeting for the roof. Use 1/2" plywood. Cut 4 pieces 8 3/4" X 14 15/16". Set the table saw miter to 40.5 degrees and the blade to 21 degrees. Cut from the peak to the corners on all four pieces. Glue and nail all four pieces onto the rafters. Now the fun part. Start cutting and nailing the Cedar shingles in place. The first course should hang over the edge about 1/2". Each additional course should be about 2 1/2" to 3" from the edge of the previous course.
We are going to install our cupola on the roof of our wheel house. Since I have a bad record with ladders I'm always extremely careful. We hope that you will be also.
If you are going to cut through the roof to make it a true vent then you'll need:
If you are going to install a wind vane like we did you should drill the mounting hole before you get it up on the roof. Don't install it until you are done though.  If you've cut a vent hole in your roof finish it off with tar paper, flashing and additional shingles if necessary. Most good carpentry books will show you how to do this. Mount the cupola onto the base and screw through the base into the cupola from each side. Mount the weather vane and you should be good to go. We put silicone sealer down into the center hole before we put in the weather vane. This will help hold it in and keep moisture out. We hope you've enjoyed this project and have good success with it. Remember, if you ever have any problems with our projects just drop us a line and we'll try to help. Since we build every one of these projects we have a pretty good idea of how to get through them. We also make lots of mistakes so we can help avoid them also. |
|
The AllAmerican RunnerDuck Review Visit our Blog, www.runnerduckreview.wordpress.com, and sign up to receive notifications when it is updated. Our newsletter is a monthly blog with woodworking projects, crafts, recipes, and more. When you get to our blog just enter your email address and click "Sign Me Up". This is what it looks like:

|