Patriotic DuckThe All American RunnerDuck Review
December 6, 2008
 Welcome Back
 

Welcome Back: 

Oh boy, tis the season! It's beginning to look a lot like Christmas and we like it. Decorations are going up all over town. Here in Coupeville we had the scarecrows in October but in December we have snowmen. No we don't have any snow and rarely get any but the Lions Club has put up around 100 snowmen all over town. Every stop sign and most telephone poles have a snowman. They really dress up the town and make it more festive.


We had a great Thanksgiving with Marilyn's sisters visiting us over the holiday weekend. We feasted on a large turkey with all the trimmings including apple and pumpkin pies.
 
Since this is the last newsletter for 2008 we'd like to take a moment to thank each of you for being a faithful reader of our little newsletter. We do not do any advertising of this newsletter only word of mouth from you. Thanks to that word of mouth we now have over 3,000 subscribers! Keep spreading the word, it seems to be working :-)
 
We wish you and your family a very happy holiday season, including a Merry Christmas, and hope that your New Year will be a better and more prosperous one. 

Ken and Marilyn
Wood'n Wares
 
WoodnWaresLogo

Wood'n Wares Gift Sets

Bob and Jean's wonderful wooden kitchen utensils are hand made in their little wood shop in Montana.  With gift giving a high priority how about giving one of their wonderful gift sets.
Give one of these beautiful gift sets of hard maple utensils and they'll be very excited. Also Wood'n Wares Spoon Oil will keep those wooden utensils looking great for years to come. It also works wonderfully on butcher blocks or other wooden kitchen products.

Get your order in for gift sets and Spoon Oil by going to, www.runnerduck.com/woodnwares.htm

Join Our Mailing List!
In This Issue
What's New
Site of the Month
Marilyn's Corner
Our Environment
The Tempos Big Band
Joke of the Month
This Months Recipe
Cookbook of the Month
Woodworking Project
Free Rockler Catalog
Please Donate
 
 
Wood Plans
Woodworking Tools
Rockler Specials
Rockler always has great specials, here's the latest! 

What's New?
The new Rikon 14" deluxe bandsaw from Woodcraft has been assembled and is working just fine. Not ever having a floor model band saw this is a real treat.


I've been resawing some large walnut and maple and this thing slices through it like butter. I keep finding more and more things to use it for and I'm fast wondering how I ever got along without it.
 
I'm working like Santa's elves getting ready for Christmas and this band saw has made the job a lot more fun. I wonder if Santa has one of these at the North Pole?

Site Of The Month
Christmas is coming and it's time to get the little ones in the sprit. This web site is always one of my holiday favorites. There are lots of fun things to see and do. Kids of all ages will love this web site.
 
Each year they improve it and this year is no exception. Grab the kids and head up to the North Pole at http://www.northpole.com and have a grand holiday time.
Marilyn's Corner

Recycled Wreath
 
Everybody these days seem to be recycling things and this is just one more example. Several years ago I made two Thanksgiving/Fall wreaths. I used grapevines from my dad's grapes he grew, eucalyptus and other dry natural materials. By now they were looking a little tired but I wanted to keep the grapevine wreath part but redo the rest.
 
 
So I pulled off the old and glued on the new. I used green eucalyptus, some antique silver balls and tinsel ribbon. The ribbon is probably over 60 years old and actually made of silver tinsel. The ribbon was from my mothers collection of stuff and the silver balls, made of gelatin and silver, were just as old.
 
I hot glued the eucalyptus but wired on the balls and ribbon so I can take them apart more easily. Then when Thanksgiving/Fall comes again I can decorate them anew.
 
By reusing and updating these wreaths I've made them into real keepsakes.
Remember we have all of our past projects archived on our web site at www.runnerduck.com. Just click on the Craft Egg.

Our Environment
This column started in our newsletter a couple of months ago with lots of participation from you, our readers but the comments have died down as of late. We hope that you are not giving up that easily on reducing plastic that gets thrown into our oceans, road sides and land fills.
 
Did you know that plastic does not biodegrade but instead just breaks down into ever smaller pieces? What this does is allow it to be ingested by ever smaller animals and fish in the food chain. These creatures get eaten by the larger creatures there by giving them a diet of plastic, this can't be good.
 
We've been promoting using cloth shopping bags to replace the plastic ones when you go shopping. Our little local grocery store even has a contest to win $50 every time you bring in alternate shopping bags. Slowly people are getting on the band wagon.
 
Susie from Eatonville, WA writes: "This year instead of those expensive gift bags I'm putting my gifts in reusable grocery totes". Good for you Susie, that's the spirit!
 
Here's a question for you, how do you reduce the consumption of those plastic drink bottles? Here's a simple example of what I do, someone gave me a plastic bottle of water. After I drank the water I rinse it out and I refill it with fresh water everyday. I know it's not the wonderful "glacial, mountain fresh, spring fed, spiritual mineral water" that sells for $2.00 per bottle but it comes from the same earth and tastes mighty good. I'm encouraging my fellow workers to do the same thing.
 
So how do you propose to reduce the amount of plastic bottles we use? Write us at kennyb@runnerduck.com

The Tempos Big Swing Band
If you are in the Seattle area and interested in hiring a great band The Tempos are ready to perform for you. Just drop a line to kennyb@runnerduck.com

The Tempos
News and CD of the Week

 Here's a great stocking stuffer idea!

"Big Swing" features fourteen great swing songs from the 40's and 50's. If you love the old big band swing music we think you'll enjoy this CD. It's the kind of music that makes you just want to get up and dance, you do remember how to swing don't you?

The only place you can get this CD is from our web site. Go to www.thetempos.com and click on the "Click Here" at the top of the web page or click the album cover.


CLICK HERE
.

If you'd like to get a taste of this CD just go to The Tempos web site. When you are at the Tempos web site click on the horn valve button that says "Hear our CD". Then click on the song titles to hear a little bit of each song.

The Tempos big swing band is available for hire. If you have a special event that could use the wonderful music of a classic sixteen piece big band be sure to contact kennyb@runnerduck.com. We perform all over the Seattle area for all sorts of events.

Joke of the Month

This months joke entitled "Forgetter Be Forgotten?", came from Robert I. Thanks for the memories I think :-)


Forgetter Be Forgotten?
 
My forgetter's getting better,
But my rememberer is broke
To you that may seem funny
But, to me, that is no joke
 
For when I'm 'here' I'm wondering
If I really should be 'there'
And, when I try to think it through,
I haven't got a prayer!
 
Oft times I walk into a room,
Say 'what am I here for?'
I wrack my brain, but all in vain!
A zero, is my score.
 
At times I put something away
Where it is safe, but, Gee!
The person it is safest from
Is, generally, me!
 
When shopping I may see someone,
Say 'Hi' and have a chat,
Then, when the person walks away
I ask myself, 'who the hell was that?
 
Yes, my forgetter's getting better
While my rememberer is broke,
And it's driving me plumb crazy
And that isn't any joke.
 
CAN YOU RELATE???
Please send this to everyone you know because I DON'T  REMEMBER WHO I SENT THIS TO!

This Month's Free Recipe
 
Holiday Ham and Cheese Ball 
 
The holiday season is upon us and it's time to do some entertaining. This recipe is great for when family and friends drop by for a little visit. They also make a nice little gift.
 
Ingredients:
  • 1 Cup Cheddar Cheese, shredded
  • 3 Oz. Cream Cheese
  • 4 1/2 Oz. Deviled Ham
  • 2 Tablespoons Green Onions, finely chopped
  • 3 Tablespoons Green Chilies, chopped
  • 1/2 Cup Nuts of your choice, chopped.
Mix all the ingredients together.
You can mix the Nuts into the ball, roll the ball in the Nuts or both.
Chill until served. 

Every month we post a new recipe on our web page. Be sure and check out the New recipe at the RunnerDuck Kitchen Store.

Cookbook of the Month
 "And That's How You Make Cheese!"
By Shane Sokol


Click!

As long as you're making a cheese ball how about making some cheese? This is a great cookbook to learn how to make cheese right at home. It's not near as difficult as you might think.
 
Jay Herbert from Baton Rouge, LA wrote this review of the cookbook: "The recipes in this book seemed longer than my other cheese book. Actually, they are not longer, they are just explained in regular English. With this book, your first cheese can be Swiss, Cheddar or Pepper Jack; no practice needed! This author did not take shortcuts and explains each recipe step-by-step. All of the popular cheeses are listed as well as a few you've probably never tried."

Woodworking Project
 

WOOD PROJECT PLANS

DOWNLOADABLE & MAIL-DIRECT
WOODWORKING PLANS
Download WOOD Store® woodworking plans directly to your computer and start building in just minutes! OR, we'll mail them to you, your choice!

CLICK!

This Months Woodworking Project

Bathroom Cabinet, Step 2

Last month we built the base to our bathroom cabinet, this month we build the cabinet and complete this project.

I made the cabinet out of clear pine and 1/4" plywood. We'll begin by cutting the sides 9" X 38" X 3/4".
There will be one shelf that is dadoed into the sides. Set up a 3/4" dado blade in your tablesaw to cut a dado 3/8" deep.
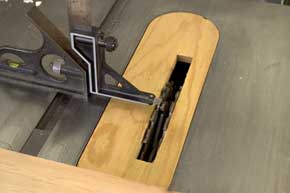
The shelf will be 5 3/4" from the bottom. Set a stop on the miter fence and cut the dado's all the way through.
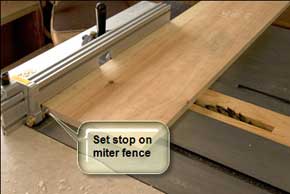
I cut them all the way through because I'm going to paint my cabinet and they won't show. If you are going to use a stain finish you may want to stop short of the front and chisel out the dado.

The sides are held to the top and bottom by biscuit joints. Lay out for three biscuits on each end marking both sides at the same time.
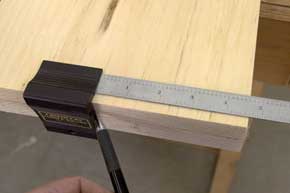
Cut in the biscuits on the top and bottom of both sides.
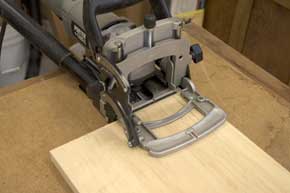
Porter-Cable Deluxe Biscuit Joiner, Model No. 557


The back of the cabinet will be 1/4" plywood so we need to dado in the backs of the sides to recess the back.
I attached a piece of scrap wood to the tablesaw fence and set the dado blade to 1/4" deep and 3/8" wide.
Mark the beginning and end of the dado blade on the fence. Use this to align your start and stop points on the side.
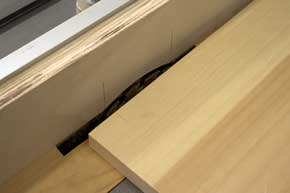
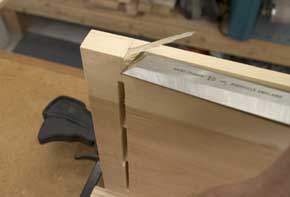
Use a chisel to complete the dado cut, squaring the ends.
I used my shelving jig to drill the holes for the shelf holes.
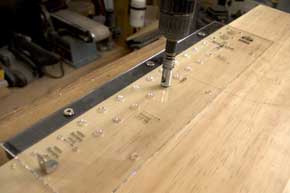
JIG IT® Shelving Jig


Cut the shelf that fits in the dado's 8 7/8" X 24 1/4".
Cut the top and bottom 10" X 26 1/2".
Round over the front and side edges of the bottom with a 3/4" Roundover bit.

Roundover/Beading Bit Set


Add a crown molding around the top front and sides. There is a large selection of different styles available at most home supply stores.
Dado the backs of the top and bottom the same as the sides to fit the 1/4" plywood back.
Align the backs of the top and bottom with the backs of the shelves and mark the centers for the biscuits.
The cabinet is now ready to glue up. Glue the biscuits, their pockets, the shelf ends and the dado it goes in. Work quickly before the glue starts to set up or use a slow drying glue.
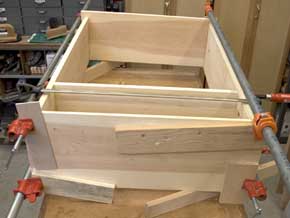
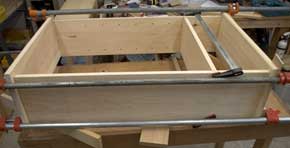
Use pipe clamps with cauls. Measure from corner to corner to make sure that it is square, then let the glue dry overnight.
I cut the back out of 1/4" plywood to fit inside the dado's I'd cut. Apply glue to the edges and nailed it in place. I did sand the inside of it first to make finishing easier later on.

Now it's time to make the doors. I decided to use lap joints for the corners. I was after an old fashion look and square corner joints seemed to fit the ticket. Each door will be 30" X 12 1/2" and made from 3/4" clear pine and plywood.
Start out by cutting the rails and stiles 30" X 1 1/2" and 12 1/2" X 1 1/2".
Using a dado cut a 1 1/2" lap joint 3/4" deep on each end.
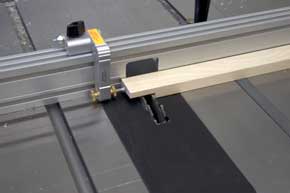
I used a stop on my miter fence to make repeatability easy.
I cut a 1/4" dado down the middle of each rail and stile to hold the 1/2" plywood.
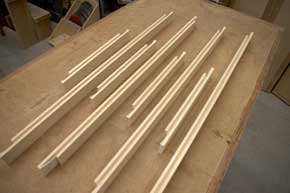
Notice that I stopped just short of the end of each piece. This saved me from having to chisel out each corner.
Cut 1/4" plywood to fit inside the frame.
Glue only the corners, not inside the dado for the plywood. You want the plywood to be able to float with weather changes.
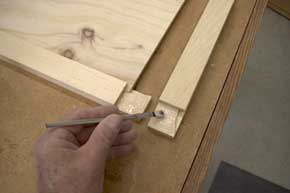
Work quickly so the glue does not dry and clamp each corner.
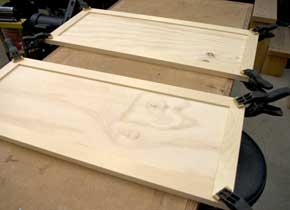
Be sure to check the squareness of each door by measuring from corner to corner. The dimension should be the same.
For hinges I decided on non-mortise hinges.

Non-Mortise Hinges
Non-Mortise Hinges


Even though they are non-mortise hinges I decided to inset them a little. I used my plunge router and clamped a piece of wood on each side for stability and routed a mortise on the cabinet side.
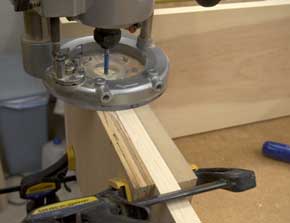
Porter-Cable 893PK Router Package
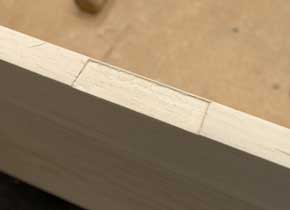


While I didn't get any good photos of the next few steps they are pretty straight forward.


I cut a 1/4" piece of plywood to fit exactly between the rails of the doors approximately 7" high.
Glue and clamp this piece in place.
Cut the fake drawer fronts from 1/2" clear pine 4 1/2" X 10 1/2".
Round over all four sides with a 1/2" Roundover bit.
Glue these centered and flush to the top of the bottom stile.
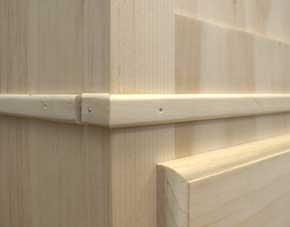
Now add the trim strips. I made them from 1/4" X 1/2" clear pine. Round over the edges with a 1/8" Roundover bit.
Cut four of them to fit the width of the door plus 1/4" to allow for the miter on one end. Miter one end 45 degrees.
Cut the tiny end pieces to fit the edge of the door plus 1/4". Miter both ends 45 degrees but in opposite directions as shown.
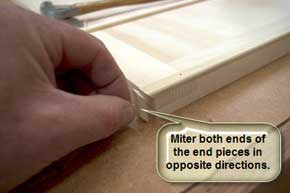
Glue and nail the trim strips with finish nails.

Apply your finish of choice to the cabinet and it's ready to mount to the base.

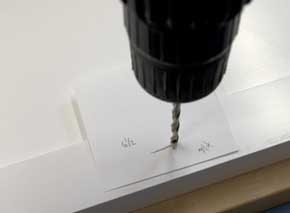
Drill holes for the pulls that go on the cabinet doors and fake drawer fronts. A little trick I like to use is a sticky note to lay out the lines for drilling.
I used figure eight fasteners to hole the cabinet to the base.
Desk Top Fasteners
Desk Top Fasteners


Drill countersink holes with a Forestner bit so the figure eight fastener is flush to the top.

Screw in the figure eight fasteners with flat head screws.

Set the cabinet on top of the base and screw up through the figure eight fasteners.

Cut and paint some shelves to fit inside the cabinet and you are good to go.
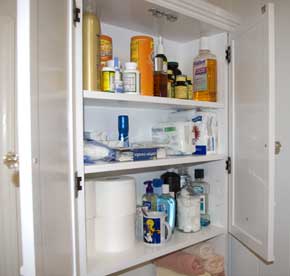
Since this cabinet has a small base it should be attached to the wall for stability.

If any of you have wood projects to share I would be happy to put it into a format for our newsletter. Just send me an email at kennyb@runnerduck.com and lets see what we can come up with. Thank you!
Free Rockler Catalog
Get a Free Rockler Woodworking Catalog by clicking on the link below


     If you want to talk about something just drop us a line to kennyb@runnerduck.com any time, we like to talk about most anything. We are always looking for content for our newsletter so if you have something to add we'd love to publish it, assuming it meets our strict family oriented requirements!

All rights reserved, RunnerDuck Productions,
2000, 2001, 2002, 2003, 2004, 2005, 2006, 2007,2008
RunnerDuck and its logos are property of
RunnerDuck Productions.
All other logos are property of the individual companies.
We can be contacted at kennyb@runnerduck.com.

Past RunnerDuck Review Newsletters