|
|
|
|
|
| Welcome Back |
April came and
went without much fanfare. As WashingtonState spring weather goes we'd say it was pretty
normal, rain, sun, cold, hot, a real mixed bag, much better than a lot of other
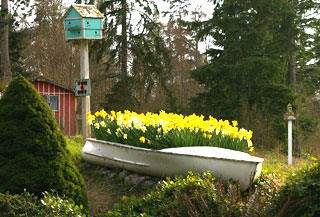
parts of the country. One of the wonders of spring is all the flowers that come
into bloom. Living on an island there are many unique nautical type flower
gardens. This one in particular caught our eye.
Our huge crabapple
tree is in full bloom and should yield a large batch of fruit later in the
year. I caught this rather interesting picture of some of the blossoms and a
P-3 Orion Sub Chaser in the background.

We live about
eighteen miles from a naval airbase so we see quite a few EA6B Prowlers and
P-3's. While the noise is a little bothersome sometimes we like to think of it
as the sound of freedom.
As far as May goes we
have no definite plans. Events start to ramp up on the island for the summer so
there will be more art tours, garden tours, outdoor markets and much more. If
you have travel plans to come to WashingtonState be sure and check
out the area islands, they can be a lot of fun and a great place to relax. Ken and Marilyn |
| Wood'n Wares |

Just in time for Mothers Day, great gift sets of hand made, hard maple, wooden kitchen utensils for mom. Bob and Jean's wonderful wooden kitchen utensils are hand made in their little wood shop in Montana.
Order a gift set for mom today! By grouping several utensils together we're able to give you a good price. Also Wood'n Wares Spoon Oil will keep those wooden utensils looking great for years to come. It also works wonderfully on butcher blocks or other wooden kitchen products.
Just go to our web site for gift sets and Spoon Oil, www.runnerduck.com/woodnwares.htm. |
|
 |
| Wood Plans |
 |
| Woodworking Tools |
Rockler Specials
Rockler always has great specials, here's the latest!
 | |
|
| What's New? |
Just a reminder
that our 2005 PT Cruiser is still for sale. You can read all about it at www.runnerduck.com/cars/pt_cruiser.htm.
We've lived on the
island for almost two years and one of the things that was in poor shape on our
house was the roof. As we write the roofers are on the roof doing their thing.
An earlier home owner had made a number of additions and did the work himself.
Now these poor roofers have to deal with all of his mistakes, what a mess. The
good news is that we'll have a good roof that should last another thirty years. |
| Site Of The Month |
The Island has a
large number of artisans and it's always fun to see what they've created when
we go to art fairs. We recently had a RunnerDuck reader write us and tell us
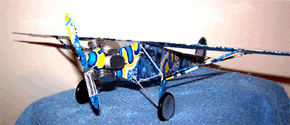
about his crafts. Jim with Tesscar Aluminum Craft has created the largest
collection of aluminum can art we've ever seen. You name it and he probably had
it in his collection. The nice thing about his work is that he sells plans for
all his models.
To check out his
incredible work and purchase plans go to www.tesscar-aluminum-craft.com.
He even has a free plan for an aluminum can Shark that you can make yourself.
|
|
Marilyn's Corner |
Dinosaur Boaters

Here's a cute little
idea that I came up with to make a little gift for the grandkids. I had a bunch
of shells that were just calling to me to be made into something cute. I had
Ken make the boat bottoms out of some scrap wood that he had then I went to
town gluing on shells, turning them into dinosaurs.

I used hot glue and
just held the shells until they would hold their position. I added the names on
the boat and sprayed them with clear acrylic paint. Now get those creative
juices flowing and make something fun!
Remember we have all of our past projects archived on our web site at www.runnerduck.com. Just click on the Craft Egg. |
| The Tempos Big Swing Band |
The Tempos summer concert schedule is coming together. If you are going to be in the Seattle area during the following dates come check us out.
- The Early Ford Picnic, June 7, 11:00 - 1:30, Bellevue Community College
- The Burien Strawberry Festival, June 20, 5:00- 7:00 Burien Community Park
- The Ballard Locks, August 16, 2:00 - 4:00, Ballard Locks
If you are in the Seattle area and interested in hiring a great band The Tempos are ready to perform for you. Just drop a line to kennyb@runnerduck.com
The Tempos
News and CD of the WeekThe Tempos CD, "Big Swing", features fourteen great swing songs from the 40's and 50's. If you love the old big band swing music we think you'll enjoy this CD. It's the kind of music that makes you just want to get up and dance, you do remember how to swing don't you? The only place you can get this CD is from our web site. Go to www.thetempos.com and click on the "Click Here" at the top of the web page or click the album cover.

CLICK HERE.
If you'd like to get a taste of this CD just go to The Tempos web site. When you are at the Tempos web site click on the horn valve button that says "Hear our CD". Then click on the song titles to hear a little bit of each song.
The Tempos big swing band is available for hire. If you have a special event that could use the wonderful music of a classic sixteen piece big band be sure to contact kennyb@runnerduck.com. We perform all over the Seattle area for all sorts of events. |
| Joke of the Month |
This months joke
came from Ken's brother Ron, http://walkingfortbragg.com/
Why Parents Drink
A father passing by his son's bedroom
was astonished to see that his
bed was nicely made and everything was
picked up. Then he saw an
Envelope, propped up prominently on the
pillow that was addressed to
'Dad.'
With the worst premonition he opened the
envelope with trembling hands
and read the letter.
Dear Dad:
It is with great regret and sorrow that I'm writing you. I had to
elope with my new girlfriend because I wanted to avoid a scene with
Mom and you.
I have been finding real passion with Stacy and she is so nice.
But I knew you would not approve of her because of all her piercings, tattoos, tight motorcycle clothes and the fact
that she is much older
than I am. But it's not only the passion...Dad she's pregnant.
Stacy said that we will be very happy.
She owns a trailer in the woods and has a stack of firewood for the
whole winter. We share a dream of having many more children.
Stacy has opened my eyes to the fact that marijuana doesn't really
hurt anyone.
We'll be growing it for ourselves and trading it with the other people
that live nearby for cocaine and ecstasy.
In the meantime we will pray that science will find a cure for AIDS so
Stacy can get better. She deserves it.
Don 't worry Dad. I'm 15 and I know how to take care of myself.
Someday I'm sure that we will be back to visit so that you can get to
know your grandchildren.
Love,
Your Son John
PS. Dad, none of the above is true. I'm over at Tommy's house.
I just wanted to remind you that there are worse things in life than a Report
card that's in my center desk drawer.
I love you.
Call me when it's safe to come home.
If you've got a funny family friendly joke send it to kennyb@runnerduck.com
|
| This Month's Free Recipe |
 Tortilla Salad
With Cinco De Mayo just around the corner we thought this would be an appropriate recipe. Tortilla Salad
With Cinco De Mayo just around the corner we thought this would be an appropriate recipe.
Ingredients:
- Tortilla Chips
- Shredded Lettuce
- 1 Can Red Kidney Beans, drained and rinsed
- Tomatoes, chopped
- Green Onions, chopped
- Jack Cheese, shredded
- Ripe Olives, sliced
- Italian Dressing
- Sour Cream
In individual dishes layer Chips, Lettuce, Beans, Tomatoes, Onions, Cheese and Olives. Pour on the Dressing and top with Sour Cream.
Serve it with your favorite Mexican dish like Burritos or Tacos.
|
| Woodworking Project |
WOOD PROJECT PLANSDOWNLOADABLE & MAIL-DIRECT
WOODWORKING PLANSDownload WOOD Store� woodworking plans directly to your computer and start building in just minutes! OR, we'll mail them to you, your choice!

CLICK!
This Months Woodworking Project
Sewing Cabinet Conversion Part II


Last month we got a good start on our sewing cabinet conversion, this month we finish it up.
Next I gutted it and made room for a large drawer. I decided to reuse the hinges and door catch so I saved the parts in a marked bag, that way I wouldn't loose them.
I used a memory stick once again to make the measurements for the drawer. I had to build out a rail support on each side of the cabinet before I could build the drawer so I'd have the final dimension.
To get the final drawer width I installed the slides. 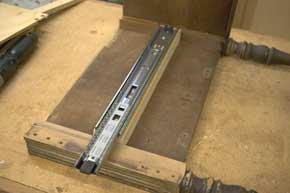
I made the drawer using dado joints in the back. For the front I stacked two pieces of wood making the inside one match the back of the drawer and just glued and nailed to the sides.
I cut a notch in the front of the drawer for a hand pull. 
I glued and clamped it all up and it was good to go, after a little varnish. 
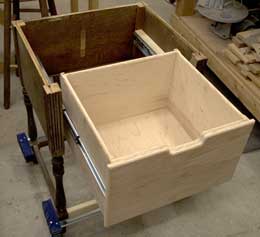
Ah, perfect fit!
Next I cut, glued and nailed a couple of small supports at the bottom of the rails to support the new shelf. 
Once that had dried I cut a piece of 1/2" plywood to fit inside the base on the runners.
The chewed leg looked pretty bad so I needed to patch that. I found some wood epoxy, mixed up a batch and started piling it on. 
After it cured I used a wood rasp and sandpaper to get it back to it's original shape, minus the chew marks.
Next came the top which I made from 1/2" plywood and some pine that I had lying around. I decided to put a 1/2" decorative edge around the plywood to hide the plywood edges.
I cut the top 1 1/2" larger then the cabinet.
I made a tall fence for my table saw and cut slots in all four edges of the plywood. 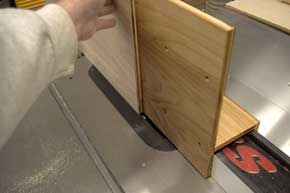
Next I used my router to cut a matching tongue in the edges. 
The edges were placed into the top to mark the miters. 
The miters were cut and the edges were glued into the top and clamped. 
After the edges were dry I routed a decorative edge all the way around.
I used figure eight fasteners to hole the top to the base. 
Desk Top Fasteners
Drill countersink holes with a Forestner bit so the figure eight fastener is flush to the top. 
Screw in the figure eight fasteners with flat head screws. 
After a good sanding I applied about three coats of paint and put it all together. It's fun to make something new out of what would have otherwise gone to the dump. I hope you can find something like this to work on for yourself.
That's about it for this month. We hope you liked this project. If you build it and your friends ask where you got such a clever idea, please tell them that you got it at RunnerDuck.com. |
|
If any of you have wood projects to share I would be happy to put it into a format for our newsletter. Just send me an email at kennyb@runnerduck.com and lets see what we can come up with. Thank you! |
| Free Rockler Catalog |
|
Get a Free Rockler Woodworking Catalog by clicking on the link below

| |
|
If you want to talk about something just drop us a line to kennyb@runnerduck.com any time, we like to talk about most anything. We are always looking for content for our newsletter so if you have something to add we'd love to publish it, assuming it meets our strict family oriented requirements!
All rights reserved, RunnerDuck Productions,
2000, 2001, 2002, 2003, 2004, 2005, 2006, 2007, 2008, 2009
RunnerDuck and its logos are property of
RunnerDuck Productions.
All other logos are property of the individual companies.
We can be contacted at kennyb@runnerduck.com.
Past RunnerDuck Review Newsletters |
|
|
|
|
| |


